| title | Slack > Incoming Webhook |
|---|
Slack / Incoming Webhook
-
Incoming Webhooks | Slack #ril
Send data into Slack in real-time.
-
Incoming Webhooks are a simple way to post messages from apps into Slack. Creating an Incoming Webhook gives you a unique URL to which you send a JSON payload with the message text and some options. You can use all the usual markup and attachments with Incoming Webhooks to make the messages stand out.
-
You can't use Incoming Webhooks with Workspace Apps right now; those apps can request single channel write access and then use
chat.postMessagein the Web API to post messages, providing very similar functionality to Incoming Webhooks.Fear not: over the next few months, we'll make sure that these features land gracefully in the world of CLASSIC Slack apps.
已經成為過去式,用一般的 CLASSIC Slack app 即可。
-
There are a few HTTP request examples in our guide, and to test these you can use something like cURL (a simple, ubiquitous tool for sending HTTP requests on the command line) or if you prefer a GUI you can also use a tool like Postman.
Getting started with Incoming Webhooks
-
We're going to walk through a really quick 4-step process (if you've already done some of these things it'll be even easier) that will have you posting messages using Incoming Webhooks in a few minutes:
-
Create a Slack app (if you don't have one already)
You won't get very far without doing this step, but luckily it's very simple, we even have a nice green button for you to click for it:
Pick a name, choose a workspace to install your app to (bearing in mind that you'll probably be posting lots of test messages, so you might want to create A CHANNEL FOR SANDBOX USE), and then click Create App. If you've already created one, you can use it too, also have a cookie 🍪.
-
Enable Incoming Webhooks
After creating, you'll be redirected to the settings page for your new app (if you are using an existing app, just load its settings via the Your Apps page).
From here select the Incoming Webhooks feature, and click the Activate Incoming Webhooks toggle to switch it on. If you already have this activated, well you deserve another cookie 🍪.
-
Create an Incoming Webhook
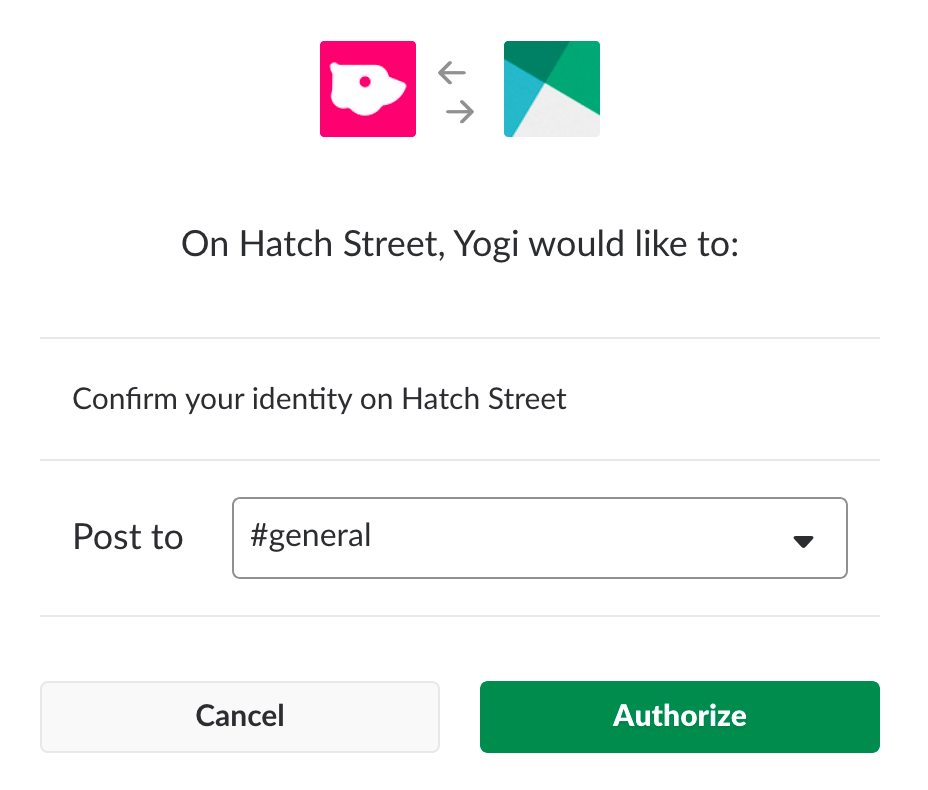
Now that Incoming Webhooks are enabled, the settings page should refresh and some extra options will appear. One of those options will be a really helpful button marked Add New Webhook to Workspace, and you should click it.
What this button does is trigger a SHORTCUT VERSION OF THE INSTALLATION FLOW for Slack apps, one that is completely self-contained so that you don't have to actually build any code to generate an Incoming Webhook URL. We'll talk more about that later on, but for now you'll see something like the following screen:
So go ahead and pick a channel that the app will post to, and then click to Authorize your app. You'll be sent back to your app settings, and you should now see a new entry under the Webhook URLs for Your Workspace section, with a Webhook URL that'll look something like this:
https://hooks.slack.com/services/T00000000/B00000000/XXXXXXXXXXXXXXXXXXXXXXXXThat URL is your shiny new Incoming Webhook, one that's SPECIFIC TO A SINGLE USER, AND A SINGLE CHANNEL. We've kind of run out of cookies, but nice work anyway! Let's see how you can actually use that webhook to post a message.
往這個 incoming webhook 寫入的 JSON payload,固定會送往特定的 channel (無法改變),用的也是建立該 webhook 的使用者身份;決定了可以看到哪些 private channel。
-
Use your Incoming Webhook URL to post a message
Later in this doc we'll explain how to make your messages more expressive or INTERACTIVE, but for right now something simple will do, so we're going to use that old standby - "Hello, world". #ril
After all this build up, you might think posting a message will be really complicated, but it's very simple. Just make an HTTP POST request like this:
POST https://hooks.slack.com/services/T00000000/B00000000/XXXXXXXXXXXXXXXXXXXXXXXX
Content-type: application/json
{
    "text": "Hello, world."
}
The URL that you're making the POST request to should be the same URL you generated in the previous step.
That's it! Go and check the channel that your app was installed into, and you should see that the "Hello, World" message has been posted by your app.
-
-
You can use this in a real Slack app without much change, just substituting your favorite HTTP Request library for cURL, but structuring all the requests in the exact same way. You will also need to pay attention to some details we've outlined below when you're DISTRIBUTING your app. #ril
-
Great work, you've set up Incoming Webhooks for your Slack app and made a successful test call, and you're ready to start making those messages more interesting and useful. Also, we baked some extra cookies to celebrate 🍪🍪🍪🍪.
-
-
-
You're reading this because you're looking for info on LEGACY CUSTOM INTEGRATIONS - an outdated way for teams to integrate with Slack. These integrations LACK NEWER FEATURES and they will be deprecated and POSSIBLY REMOVED in the future. We do not recommend their use.
Instead, we suggest that you read about their replacement - Slack apps. Slack apps can be built just for your own workspace or distributed through the App Directory, and they can use the latest and greatest APIs and UI features.
Migrating from legacy incoming Webhooks
-
If you previously created any incoming Webhooks using legacy integrations, you should switch to using the same functionality with a Slack app instead. To do this you need to follow the Getting Started with Incoming Webhooks guide and create new Webhooks to replicate your existing ones.
The majority of your legacy code for sending messages using incoming Webhooks should continue to work within a Slack app without much modification; the only thing you can no longer do is CUSTOMIZE THE DESTINATION CHANNEL AND AUTHOR IDENTITY AT RUNTIME.
還有 icon 也不能換;因為 Slack app 下的 incoming webhook,其 author identity 就是 Slack app 本身,至於 channel 則在建立個別的 webhook 時就決定了。
以 GitLab 的 Slack Integration 為例,設計上是一個 webhook、可以自訂 username,且每個不同用途可以指定其他 channel name,這用法也只有 legacy webhook 支援。
Legacy information
-
Though we recommend that all legacy custom integrations should migrate to Slack apps, we also understand that some will still need to MAINTAIN OLDER INTEGRATIONS. This section contains any information about using incoming Webhooks that is specific to the legacy implementation.
-
Legacy managemet
If you need to configure your legacy integrations, you can access the Integrations management pages here.
還是可以建立新的 legacy incoming webhook。
-
Additional limitations
While you can use legacy incoming Webhooks to post messages, they do not have access to INTERACTIVE MESSAGES FEATURES. To make your messages interactive, you'll need to create an incoming Webhook with a Slack app instead.
猜想就算硬是塞進 interactive component 按了沒不會有作用,因為不知道要往哪個 Slack app 的 request URL 送 ??
-
Runtime customizations
Here is a reference list of fields that are used with legacy incoming Webhooks to provide RUNTIME CUSTOMIZATION:
-
username- override the legacy integration's default name. -
icon_emoji- an emoji code string to use in place of the default icon. -
icon_url- an icon image URL string to use in place of the default icon. -
channel- override the legacy integration's default channel. This should be an ID, such as C8UJ12P4P.試過給名字也是可以的。
-
-
官方不推薦使用 LEGACY custom integration,而 Slack app 提供的 incoming webhook 也不再支援覆寫 channel、username 跟 icon,顯然這個功能應該儘量少用。
Though it is best to use a single incoming webhook for a specific purpose, ...
-- Runtime Customization - Incoming Webhooks | Slack
You cannot override the default channel (chosen by the user who installed your app), username, or icon when you're using Incoming Webhooks to post messages. Instead, these values will always inherit from the associated Slack app configuration.
參考資料:
- 在 Your Apps > Incoming Webhooks 下方 Webhook URLs for Your Workspace 列出的 webhook URLs,如果不是自己建的,URL 無法複製、Channel 如果是 private 也只會看到 "a private channel",只會在 Added By 看得到 "誰在什麼時候建了這個 webhook"。
- Runtime Customization - Incoming Webhooks | Slack #ril
- 一開始就說,最好是 "use a single incoming webhook for a specific purpose",但某些情況下可能會想 override channel 跟 authoring identity 等。
- Username 跟 icon 可以分別用
username與icon_emojifields 覆寫,例如{ "username": "ghost-bot", "icon_emoji": ":ghost:", "text": "..." } - Default channel 則用
channelfield 覆寫,可以轉向 public/private channel,甚至是多人的 direct message。這裡填 channel/user ID 的做法看不太懂?? 之前不都用#channel或@username?
- Incoming Webhooks | Slack
- You cannot override the default channel (chosen by the user who installed your app), username, or icon when you're using Incoming Webhooks to post messages. Instead, these values will always inherit from the associated Slack app configuration. 全都不能 override 了。
- Variables - Basic message formatting | Slack 有些 special command 用
<!COMMAND>表示,目前有!channel、!here跟!everyone分別對應@channel、@here與@everyone這些平常的用法。 - 確認過加在 attachment 的
text或title也可以有作用。
import urllib2, json

req = urllib2.Request('https://hooks.slack.com/services/A00000000/B00000000/XXXXXXXXXXXXXXXXXXXX')
req.add_header('Content-Type', 'application/json')

data = {
    'text': 'Hello World!',
    'channel': "@yourname",
    'attachments': [{
        'color': "#36a64f",
        'text' : 'Attachment here'
    }]
}

urllib2.urlopen(req, json.dumps(data))