A Next.js-based platform for student job management and recruitment.
- Multi-step registration flow with comprehensive profile building
- Login with email/password
- Profile management including:
- Personal information
- Education history
- Work experience
- Skills assessment
- Document uploads (Civil ID, Driver's License)
- Profile photo and video introduction
- Activity tracking
- Assignment management
- Banking information
- Chat system
- Company interactions
- Interview scheduling
- Payment processing
- Wallet management
- Work history and logging
- Internationalization support (i18next)
- Error tracking (Sentry)
- Analytics integration (Mixpanel)
- Form validation (Zod)
- UI Components (shadcn/ui)
# Install dependencies
npm install

# Start development server
npm run devDetailed documentation can be found in the /docs directory:
- React.js
- TypeScript
- Redux Toolkit
- TailwindCSS
- shadcn/ui
- Zod
- i18next
- Sentry
- Mixpanel
https://www.npmjs.com/package/zod#basic-usage
- test OneSignal
- google signin deprecated, need to migrate, can try next.js popular auth.js with other option like linkedin, facebook
Generate a Static Build Ensure your Next.js app uses Static Site Generation (SSG) or fully static content. Update the next.config.js file:
module.exports = { output: 'export', };
This tells Next.js to export the app as static HTML. Run the build and export commands:
npm run build npx next export
This generates a out folder containing your static files.
- getStore error on login page
- tabs flashing on route change
- search icon in education page inputs
- Error: Push notification prompting can only be done from a user gesture.
- mixpanel error in dev console
- OneSignal
- Photo upload
- Video upload
- CV upload
- App notification for chat message if not in app?
- location tracking with background service
#app for first time
-- https://www.npmjs.com/package/@codetrix-studio/capacitor-google-auth
-- update super class to androidx.core.content.FileProvider in FileProvider file (io.github.pwlin.cordova.plugins.fileopener2 package)
-- add below in info.plist
<key>NSLocationAlwaysAndWhenInUseUsageDescription</key>
    <string>Required to clock in and clock out time</string>
    <key>NSLocationWhenInUseUsageDescription</key>
    <string>Required to clock in and clock out time</string>
    <key>NSCameraUsageDescription</key>
    <string>Candidate App needs permission to Upload/Record introduction video to build profile for job purpose</string>
    <key>NSPhotoLibraryUsageDescription</key>
    <string>Candidate App needs permission to access photos on your device to show on profile for job purpose</string>
    <key>NSPhotoLibraryAddUsageDescription</key>
    <string>Candidate App needs permission to access photos on your device to show on profile for job purpose</string>
    <key>NSMicrophoneUsageDescription</key>
    <string>Candidate App needs permission to access mic to record voice for introduction video</string>
    <key>NSUserTrackingUsageDescription</key>
    <string>App would like to access IDFA for tracking purpose</string>
-- sync app then open in xcode
- change assets folder for splash screen and icons
- App
- General Tab
- change Display Name
- change App category
- change build version if already has any (build version for development and version is for live)
- in framework/libraries Section: add OneSignal xcframework
- Signing & capabilities Tab
- select team in all debug and release tab
- add capabilities: push notification and sign in with apple -Info Tab
- add privacy - Location always and when in use usage... : with detail
- General Tab
- Clear all issue and clear all build from product folder then run app on simulator or on live mobile for testing
keytool -genkey -v -keystore android-release.keystore -alias release -keyalg RSA -keysize 2048 -validity 10000
Bawes@231!
keytool -list -v -keystore D:\xampp\htdocs\plugn-dashboard-ionic\android-release.keystore
65:61:CD:01:87:BB:88:54:19:73:4B:F7:8A:55:38:92:D5:01:33:E1:C3:E9:96:18:27:58:D8:8D:20:5A:F0:F6 ionic integrations enable cordova : in case to add config.xml file
cmd : ionic capacitor sync --configuration=production-mobile https://ionicframework.com/docs/v5/react/your-first-app/deploying-mobile
** Docker
To run in container
docker compose up
** Build and Deploy using Dockerfile
To build a Docker Image, we have to run the following command in our terminal:
docker build -t <image-name>:<tag-name> .
To run the built docker image, use the following command:
docker run -d --publish 3000:80 --name <image-name> --network <your local ip> <image-name>:<tag-name>
To run container
docker run -d --publish 3000:80 <image-name>
To access in browser
http://localhost:3000
For ionic serve command, replace port 3000 with 8100
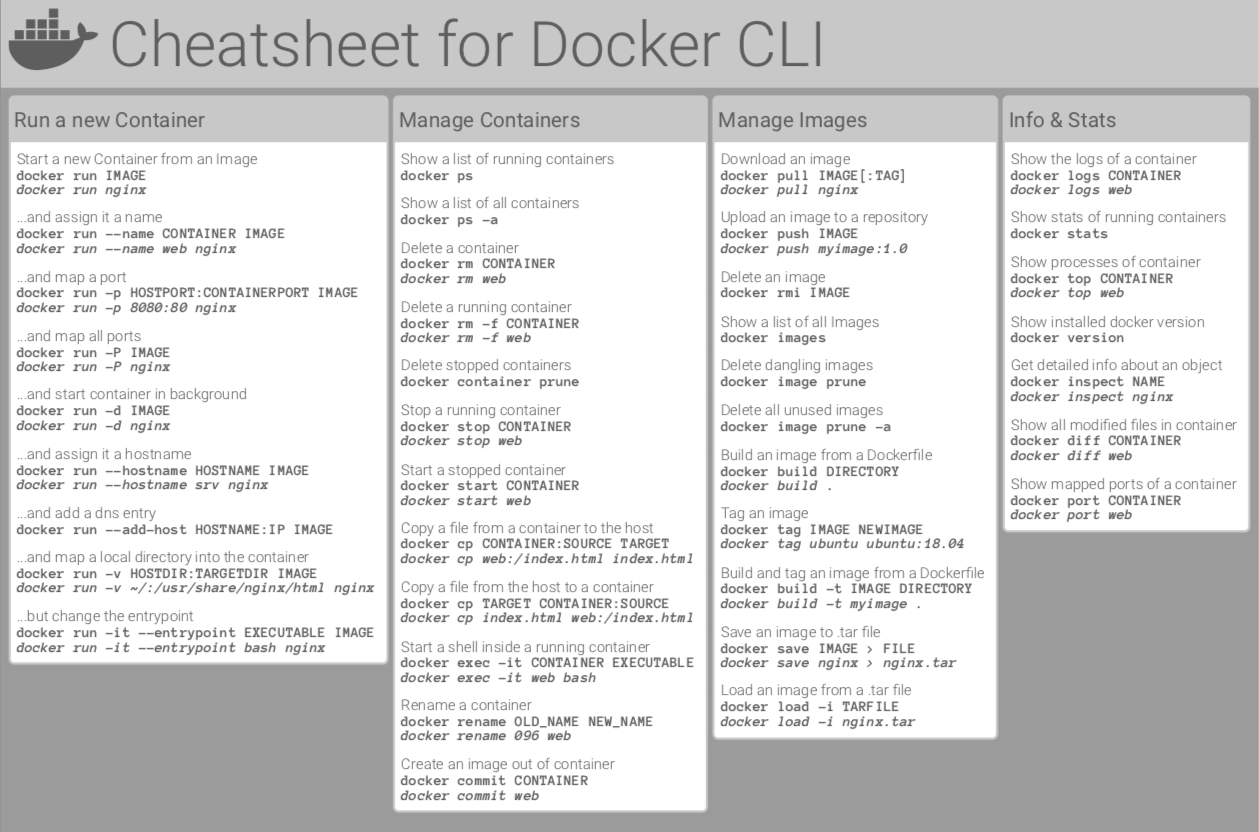
For more commands follow the link
https://raw.githubusercontent.com/sangam14/dockercheatsheets/master/dockercheatsheet8.png
- phone-number
- dob
- gender
- nationality
- area
- personal-info-complete
- educations
- skills
- experience
- education-complete
- driver-license
- personal-photo
- about-yourself
- objective
- video
- civil-id
- preferred-time
- complete