VNCake is an open-source program, to host your distribution, or almost any operating system easily.
Imagine DistroSea, but open sourced and you can self-host it.
With GUI and CLI options, it only takes a few clicks to deploy your VNCake server!
CLI / GUI: Make your settings, check your logs and host easily!
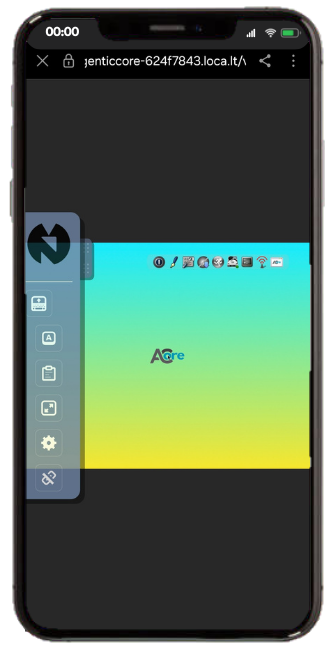
Tunneling: VNCake uses Tunnelify library to be able to create Cloudflare or Localtunnel tunnels for every VM. You can choose between Cloudflare and Localtunnel, and choose a custom subdomain for your project! (only on localtunnel)
- Why?
- Cloudflare is stable and fits better to long-time connection use-cases.
- Pros:
- (more) Stable.
- Less downtime.
- Faster.
- Cons:
- Deploys slow (takes around 1-2 minutes!)
- Longer domain name.
- Cant customize the subdomain.
- Examples:
- Self-hosting VNCake and accessing your VMs anywhere, reliably.
- Pros:
- Localtunnel is fast and fits better to quick-deploy (and access) to VM.
- Pros:
- Quick deploy (around 3 seconds, you can access your VM right away!)
- Custom subdomains for every VM. (
https://thecustomsubdomainyouchoose-randomcodeforeveryVM.loca.ly) - Shorter domain name. (
loca.ly)
- Cons:
- Less stable than Cloudflare
- Can be down sometimes (not common!)
- Requires a secret code before being able to open VNC screen. (code is special for your VM, learn more here.)
- Examples:
- Quick access to VNC screen on Linux distribution websites. (Try-on-browser feature)
- Pros:
- Cloudflare is stable and fits better to long-time connection use-cases.
Captcha Option: You can set Captcha image validation in one click, to protect your VPS! Customizable Frontend: With the help of Flask templates, you can edit the login, signup and dashboard front-ends easily! Account System: Thanks to accounts, everyone has their own VM environments, and your VPS is being protected from overload! Easy to host: Online in one line.
-
git clone --recurse-submodules https://github.com/MYusufY/VNCake.gitThis will clone the VNCake with VNCake-custom noVNC fork in it. So everything should be ready! If you want to use another noVNC, you can choose the path using the steps below.
-
cd VNCake -
./vncake-> Default Python version, orpython3.yourversion vncakefor custom.
-
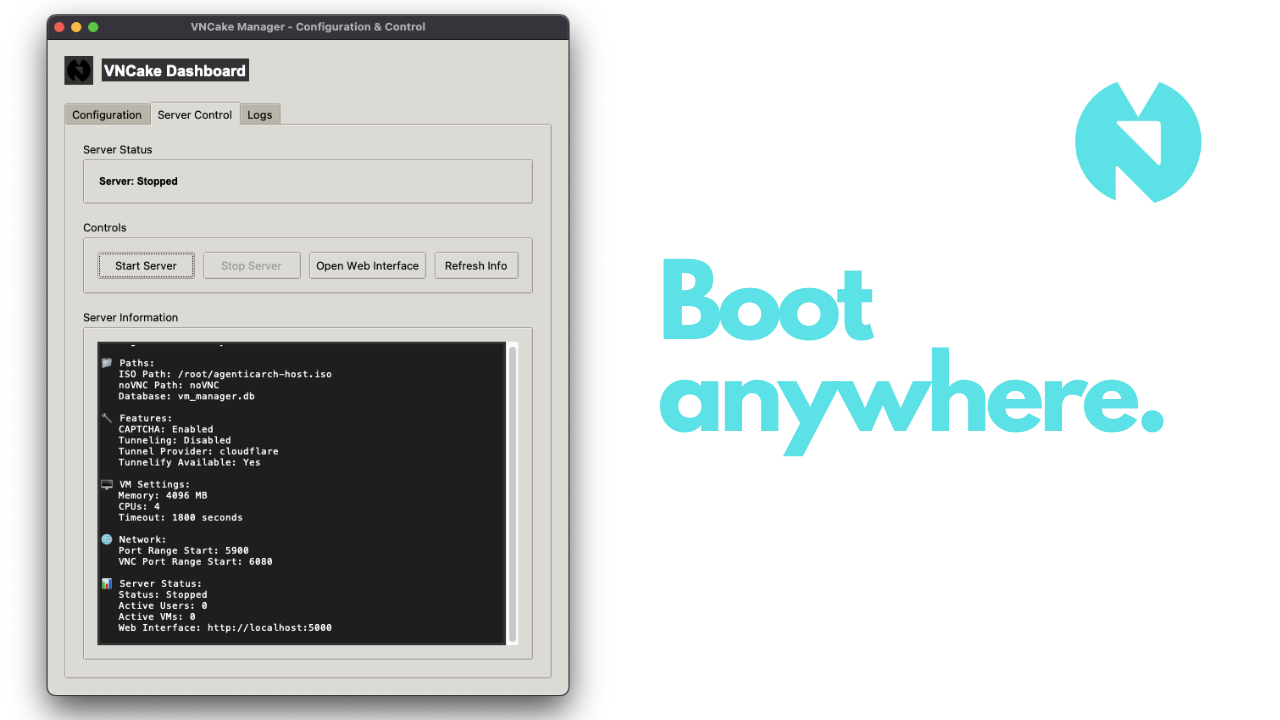
Basics
- Set ISO path to be hosted and noVNC client path.
CLI
vncake --cli --iso-path /path/to/custom.iso-> Will host this ISO.vncake --cli --novnc-path /opt/noVNC-> Will use this noVNC. GUI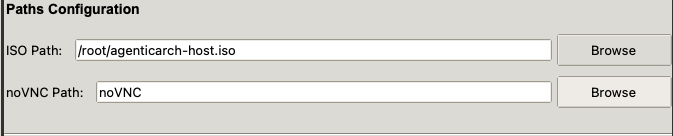
- Set ISO path to be hosted and noVNC client path.
CLI
-
Enable Captcha
- When enabled, it will verify that the user is a human
- This does not affect the account system; email and password is still required.
CLI
vncake --cli --captcha-> Enable Captchavncake --cli --no-captcha-> Disable Captcha GUI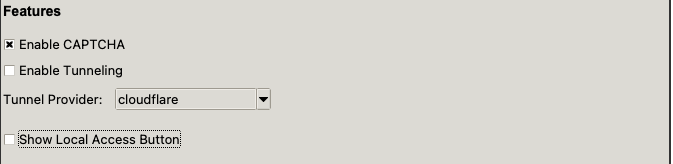
-
Enable Tunneling
- When enabled, it will host the VNC-viewers of the specific VMs using the tunnel provider you selected.
- Tunnel Providers:
- Cloudflare - stable
- Localtunnel - fast (for deploying)
- Tunnel Providers:
- If you dont activate this, your VMs will only be accessible for you, on localhost.
CLI
vncake --cli --tunneling-> Activate tunnelingvncake --cli --tunneling --tunnel-provider cloudflare-> Use cloudflare as tunnel providervncake --cli --tunneling --tunnel-provider localtunnel-> Use localtunnel as tunnel providervncake --cli --tunneling --tunnel-provider localtunnel --localtunnel-subdomain myvms-> Use localtunnel as tunnel provider with custom subdomainvncake --cli --no-tunneling-> Disable tunneling GUI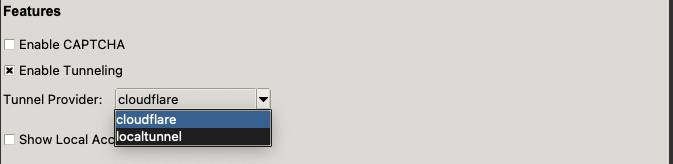
- When enabled, it will host the VNC-viewers of the specific VMs using the tunnel provider you selected.
-
VM Settings
- You can customize the timeout-time and QEMU VM resources.
CLI
vncake --cli --memory 8192 --cpus 8-> Set custom memory and CPUsvncake --cli --timeout 1800-> Set custom timeout (as seconds) GUI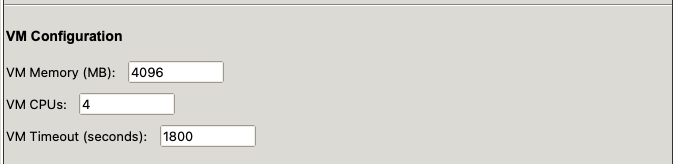
- You can customize the timeout-time and QEMU VM resources.
CLI
-
Network / Port Configuration
- You can set port and VNC port start points.
CLI
vncake --cli --port-start 6000 --vnc-port-start 7000-> Normal port start 6000, VNC port start 7000.vncake --cli --host 192.168.1.100 --port 8080-> Custom host & port. GUI
- You can set port and VNC port start points.
CLI
-
Help! CLI - General help:
vncake --help- CLI help:vncake --cli --help
- The
--cliflag is required to run in command-line mode. - Tunneling requires the
tunnelifypackage to be installed. - Make sure the ISO file and noVNC directory paths are correct.
- Use
--debugflag for more verbose output during development.
- You can use any VPS service or your own VPS to host a VNCake server. If you're using a server without a DE (in most cases), you can follow the guides above to host with VNCake in CLI.
mindmap
  root((VNCake))
    (QEMU VM handling)
      (auto-stop after inactivity)
      (a VM for every user)
      (custom VM specs)
    (Tunnel Handling)
      (tunnel provider options)
      (a tunnel for every VM)
    (Account & Security)
      (prevent overload)
      (Captcha options)
- VNCake Dashboard will be started on localhost. You can test it locally, but you need to host at the end, to make it accessible everywhere :) To do that, you can use tunneling (separate from VM tunnels) or any other method.
VNCake only tunnels VMs (if activated). So it will not tunnel "itself". You should do it manually!
Basically, you can try or test it with:
lt --port 5000 --subdomain myvncakeserverBut for more stability and using your own domain, you can use Cloudflared.
- Self-tunneling
- Multi-OS (ISO) option.
- Improved README
- Deploy in a package manager
You can contact me using yusuf@tachion.tech
You can support me using "Buy Me A Coffee"!