This repository contains an example of a microservice hosted in AWS using Elastic Container Services (ECS) and node primiarly. The focus of this repository is to answer some common questions around designing, building, deploying, and managing a microservice.
The example application we are going to build will illustrate how to manage an external service dependancy and how to manage when that dependancy fails now and then by defining a fallback strategy that uses a different external service. We will build a small application that shows the weather for a given zip code. In this code base we will see a single page application that communicates with an API that is a proxy to some external weather services. Something like this:

Below are a list of common questions and their answers as illustrated in this codebase.
How do I manage a fallback strategy for downstream or external microservices that might be failing or non-performant?
The circuit breaker pattern is best for managing this type of problem. When you have a service (A) that is dependant on another service (B) - which can be an internal or external service - you need a way to ensure that the downstream service responds in an acceptable amount of time, doesn't continually throw errors, or isn't totally non-responsive. Any of these types of activities can cause a ripple effect of degraded services if you don't manage your dependancies appropriately. This activity shouldn't be performed as a concern within the bounds of a single request - but rather should be monitored over the life of the runtime that is performing the requests to the down stream service. This way if you notice that the SLA (speed at which the service responds to you) is not being met once now and then vs. every time you make a request - you can take an appropriate action so that your application isn't affected by this slowing service. Fallback strategies can be written many ways: you call another service when your primary service fails, you can log a message to be processed once the failing service comes back up, you can alert an administrator, etc. The compensating action take will be dependent upon the operation you are trying to perform.
In this example application we will use "brakes" as our implementation of the circuit breaker pattern for node. https://www.npmjs.com/package/brakes
Hystrix is a dashboard that provides a view into all of your services and the health of each service.

Each of the widgets in the dashboard shows a dense view of information surrounding the service.
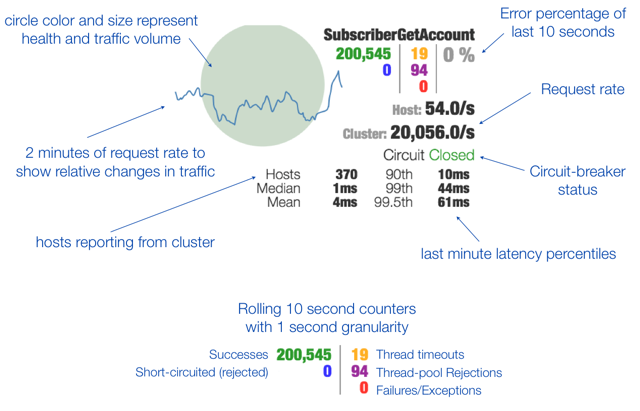

For each service you can quickly identify the health of a service (up or down) and the traffic volume going through a given service. You can also visualize traffic spikes, whether a circuit is closed or open average response times, errors being experienced, etc. This dashboard is fed its information by the circuit breaker implementation (not all circuit breakers work with Hystrix - Brakes does though).
Contract break
Logic change
Additivie functionality / bug fixes
Depending on if you are on a mac, linux, or windows machine this step will be slightly different. Start here https://docs.docker.com/engine/installation/
Once you have docker installed you should be able to go to a terminal window (I am using iTerm2 on mac) and type the following command:
docker --version
You should see a version listed if all went well.
New to node? First - install node on your machine. Start here.
Then you need to head over to nodeschool.io (which is free). It will tell you all there is to know about node. But it does it through interactive training session via the command line using the node package manager (NPM).
You will need a great text editor like Visual Studio Code, Atom, Sublime Text, Textmate, or Brackets.
We will be hosting all of our examples in AWS so you will need to create a [free account(https://aws.amazon.com/free/) over there. Preferably use a gmail account when signing up as you will need a few accounts in this demonstration.
In our example we will show you how to use multiple accounts to isolate your development, integration/staging, and production environments. This type of isolation is great from a security perspective but also cuts down on the noise in your CI/CD scripts as well as noise in each of the accounts. In order to keep all of these accounts on the free tier you might use gmail and their +tag-name hack to differentiate the same email when signing up for multiple accounts.
When signing up you will be prompted to add a credit card. And Amazon will call you to verify that you are a real person (automated call).
Once you have an AWS account configured you will want to go grab the AWS shell. AWS shell is a shell written in Python that gives you interactive hints as you navigate through all the AWS services and functions. This makes working with AWS on the command line pleasant. You will need Python. AWS would tell you that you also need an upgraded PIP installation.
pip install aws-shell
If you are on a mac like me you will likely have to try this instead:
sudo pip install aws-shell --upgrade --ignore-installed six
Use CTRL-D to exit the aws shell.
Once you have the shell installed you will need to configure your AWS credentials using aws configure. You can follow those steps here.
Next we will install TerraForm. TerraForm is a convenient way to manage our AWS (or other environments) as code. You have likely heard of Infrastructure as Code. TerraForm allows us to build our infrastructure in files that we can then check in as part of our github repository. You can then make changes to the configuration files and apply those changes to a given environment for a given service or set of services. Start here to get TerraForm installed.