
Wouldn't it be cool to have a full-featured, reusable among teams and easy to configure CI Pipeline that you could just clone into your Go applications repository with a one-liner, and you are done?
And what if it could not only guarantee the integrity of your code base, but
could also allow you from within your GitHub repository Actions section
handle the whole development cycle (safe deploys, infra management, etc.) ?
So that is, at its core, the simple idea behind Go Workflow Yourself!
NOTE: GWY is one of the components of a bigger open-source project, a #BigTech style development ecosystem, in charge of safe-guarding the development cycle and applications deployments. The other components will be released in the following days so, if you want to stay tuned with the latest news about the entire ecosystem, check my LinkedIn profile.
- GWY CI Pipeline
- Running Workflows Manually
- Workflows Summaries & Evidence
- Versions Releasing to AWS/ECR
- Releases Automatic Badges Generation
Go Workflow Yourself delivers a full-featured GitHub
Actions CI Pipeline that performs the following actions:
- unit tests and coverage check
- hardcoded secrets scan
- vulnerabilities scan
- outdated dependencies scan
- gofmt and linting scan
- automatic generation and update of documentation badges
- release push to AWS/ECR (more platforms coming soon)
You can check here a full GWY report.
Note: To view the full workflow report, including the Job Summary
section, please ensure you’re logged into GitHub. Anonymous users may
only see annotations and artifacts sections in report.
Just go to the application repository root
where you want to integrate GWY and run:
curl -fsSL https://raw.githubusercontent.com/earcamone/gwy/assets/scripts/install-gwy.sh | bashThe installation one-liner will integrate the latest GWY workflows into your
repo's .github directory. All GWY files start with gwy- just in case you
have your own workflows, to prevent conflicts during this process.
IMPORTANT:
GitHub Actions have some twerks which we can't avoid. Once the installation
script integrates GWY in your local repo and you push the files, GWY workflows
won't be visible in the Actions section until they are merged to the default
branch though you should see GWY CI Pipeline triggered if you create a pull
request for the branch pushing GWY files because GWY hooks to pull requests
creation events to run its CI by default.
The recommended best practice to see all workflows in the Actions section
and enjoy all GWY features without restrictions is to integrate GWY, config it
and release a version of your application to your default branch with GWY
files in it as soon as possible, from there on, you can forget about it and
let it safeguard your development cycle :P
There is a lot of work around GWY to present cool looking clickable reports,
evidence artifacts, handling of errors, etc. and this includes trying to ease
the need to endure complex configuration processes.
Though, being a CI, as you can imagine, there is still some mandatory
config you will have to do, though I tried to make it as easy as possible.
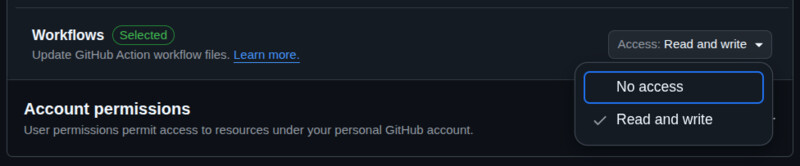
GWY requires a GitHub fine-grained token stored in your repo
with secret name GWY_TOKEN_REPO with the following permissions:
- Contents: read and write
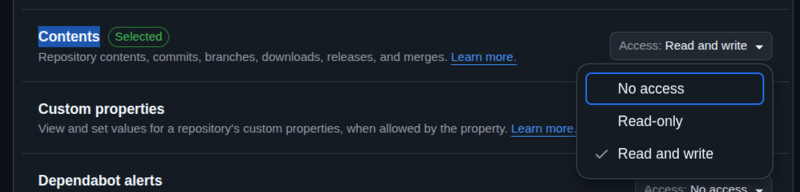
- Pull Requests: read and write
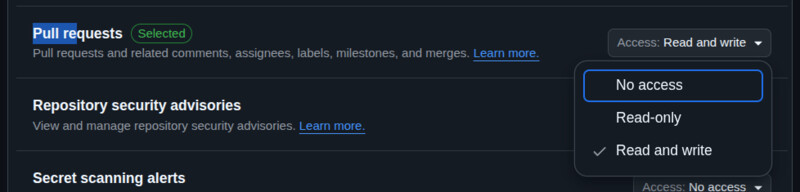
- Workflows: read and write
NOTE: You need to configure this step only if you are going use the
GWY/Release: AWS/ECR workflow, otherwise, you can skip this step. Next
release will integrate IODC support, removing the need to use AWS access keys.
You will need to create in your AWS account an access key with the required permissions for GWY to be able to release your application versions to ECR, following I will guide you how to do it:
Create a policy with the following content using the json editor
here:
{
  "Version": "2012-10-17",
  "Statement": [
    {
      "Effect": "Allow",
      "Action": [
        "ecr:DescribeRepositories",
        "ecr:CreateRepository",
        "ecr:GetAuthorizationToken",
        "ecr:BatchCheckLayerAvailability",
        "ecr:InitiateLayerUpload",
        "ecr:UploadLayerPart",
        "ecr:CompleteLayerUpload",
        "ecr:PutImage",
        "sts:GetCallerIdentity"
      ],
      "Resource": "*"
    }
  ]
}
Each required permission is used for the following commands:
- Describe ECR Repositories (aws ecr describe-repositories)
ecr:DescribeRepositories
- Create ECR Repository (aws ecr create-repository)
ecr:CreateRepository
- Get AWS Account ID (aws sts get-caller-identity)
sts:GetCallerIdentity
- Authenticate to ECR (aws ecr get-login-password)
ecr:GetAuthorizationToken
- Push Docker Image to ECR (docker push)
ecr:BatchCheckLayerAvailability
ecr:InitiateLayerUpload
ecr:UploadLayerPart
ecr:CompleteLayerUpload
ecr:PutImage
Create a new AWS user or select an existent one and attach to it the new policy.
Once you have a user with the policy attached with GWY required permissions,
you can retrieve an access key for it selecting the user and browsing to the
following options: Security credentials > Create access key
The access key must be saved with repo secret name GWY_TOKEN_AWS, separating
the generated access key ID and secret access key with a : character, example:
JDNX8XALZO2N5NA9NC3Q:JDnwiNDLx9dkd2S09dZ/d39ClwJ4MD0x9wjdOE7c
NOTE: Needless to say that the above is a random bogus access key :P
After you configure the two secrets, GWY should work out of the box, though with all options enabled which you might want to disable some. So, in the next section, I will describe you the different available workflows and how to run and configure them.
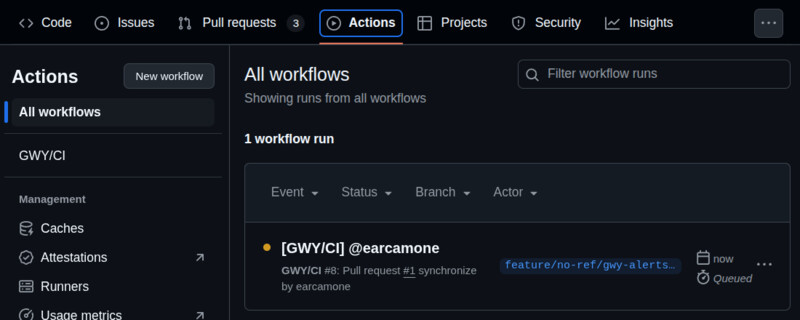
Once you installed successfully GWY, you should see
the following workflows in your repo's "Actions" section:
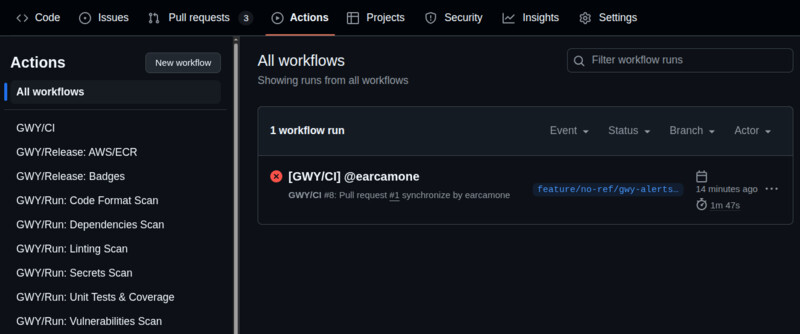
IMPORTANT: Remember (as stated in the configuration section) that you
need GWY files merged to your repo default branch in order to see all GWY
workflows listed in the Actions section, otherwise you will only see GWY
CI Pipeline if you create a Pull Request for the feature branch pushing GWY.
Usually, you will fine-tune GWY main CI and have it triggered automatically
upon each pull request creation (by default GWY is configured like this) or
pushes to your repository, thought, GWY CI and all its individual actions
can be run manually over any desired branch. When running workflows manually,
you can also specify the Go version you want the workflow to use to perform
its action, though by default it will use the version in go.mod file.
GWY/CI is GWY main CI Pipeline, located after installation in your repo at
.github/workflows/gwy-ci.yml, which by default gets triggered with each
pull request creation. You can edit the events triggering it editing the
on: section in it like you would do with any other GitHub Actions workflow.
You can check a GWY CI full report here.
Note: To view the full workflow report, including the Job Summary
section, please ensure you’re logged into GitHub. Anonymous users may
only see annotations and artifacts sections in report.
To enable or disable any of its options, you just edit the file and set the self-explaining environment vars located at the top of the file, comment descriptions over each config variable option will guide you out:
env:
  # Go version CI should use to run?
  # <CURRENT> uses branches go.mod one.
  GWY_GO_VERSION: "<CURRENT>"

  # Should the CI allow PRs merging if
  # any of the enabled CI actions fail?
  GWY_ALLOW_MERGE_ON_FAILURE: false

  # Individual Steps Timeout: set the TO for each
  # step issued command that might take some time
  GWY_TIMEOUT: '5m'

  # Test & Coverage Scan? set true if you want
  # CI to run unit tests and coverage analysis
  GWY_TESTS: true

  # Test command custom flags? edit the following
  # string to pass custom options to go test command
  GWY_TESTS_FLAGS: ''

  # Coverage Minimum Threshold: set coverage
  # minimum threshold to succeed validation
  GWY_TESTS_THRESHOLD: '90'

  # Functions Minimum Coverage Notice:
  #
  # Set the minimum coverage threshold you want
  # the summary to notice individual functions
  # that are not meeting it. This option does
  # not interfere at all with the prev. coverage
  # threshold option, it is a cosmetic option
  # used to note in coverage summaries individual
  # functions that are not meeting a minimum
  # coverage threshold.
  #
  # For example, if you want to see in the
  # summary all individual functions coverage,
  # you set it to 101 (all functions will have
  # a coverage lower than 101), if you want to
  # see functions with coverage under 50%, you
  # guessed it! set to 51 ;) and if you want
  # summary to only show the projects coverage,
  # without individual functions coverage, set
  # to 0 (functions can't have -1 coverage).
  #
  # I tend to set this option to 51, which helps
  # me notice in the CI, even when it might be
  # passing, some functions that actually were
  # not fully tested when they could. Summary
  # will link to the function, helping you
  # quickly check the function body.
  #
  GWY_TESTS_SUMMARY_THRESHOLD: '51'

  # Vulnerabilities Scan? set true if you want
  # CI to check vulnerabilities in your code
  GWY_VULNERABILITIES: true

  # Code Hardcoded Secrets Scan? set true if you
  # want CI to scan code for hardcoded secrets
  GWY_SECRETS: true

  # Outdated Dependencies Scan? set true if you want
  # CI to check for imported outdated dependencies
  GWY_DEPENDENCIES: true

  # Outdated Dependencies Scan Automatic Fixes? set
  # true if you want CI to create a PR to the branch
  # updating the outdated dependencies automatically.
  GWY_DEPENDENCIES_PR: true

  # Code Format (gofmt) Scan? set true if you want
  # CI to check for code format issues in the code
  GWY_GOFMT: true

  # Code Format (gofmt) Scan Automatic Fixes? set
  # true if you want CI to create a PR to the branch
  # updating the code format issues automatically.
  GWY_GOFMT_PR: true

  # Code Linting Scan? set true if you want CI to
  # scan for linting issues in your codebase
GWY_LINT: trueGWY CI Pipeline and all its workflows can be run manually using the
"Run workflow" button located in the top right corner of Actions:
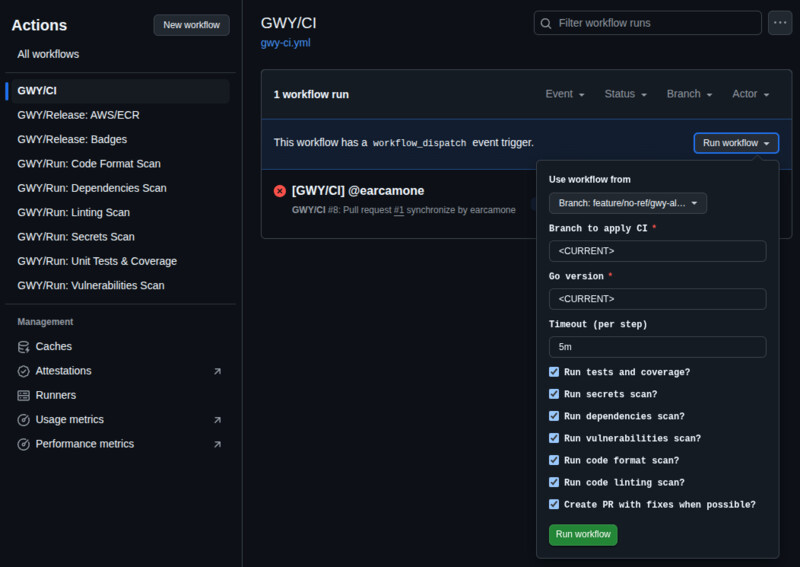
Manually running GWY CI allows you to enable or disable any of its options per run, no matter what it is configured within its file. When run manually, like the other GWY individual workflows, you can specify the target branch to which you want to apply the workflow and the Go version you want it to use when running your application checks.
All GWY Workflows have these options.
When setting the Go version, <CURRENT> will pick the one specified in the
target branch go.mod file (default option), or you can specify a different Go
version if you want to check the compatibility of your code with other versions.
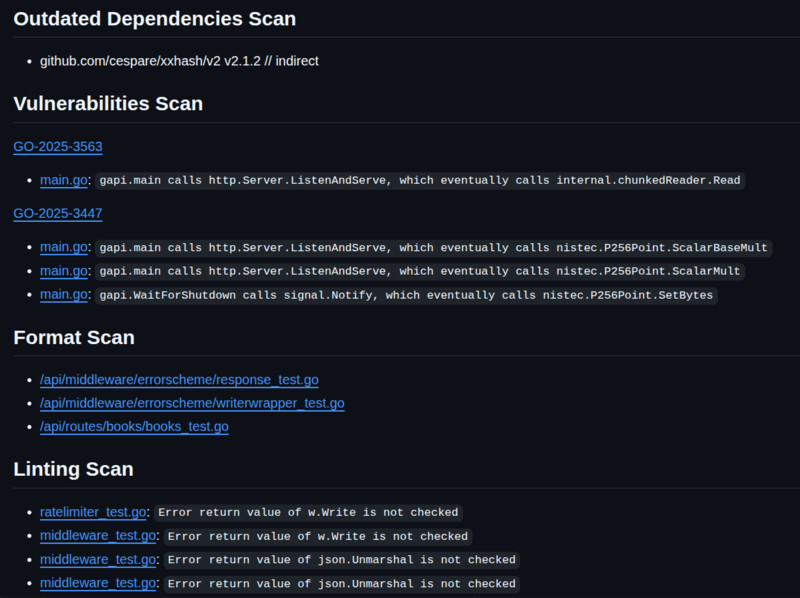
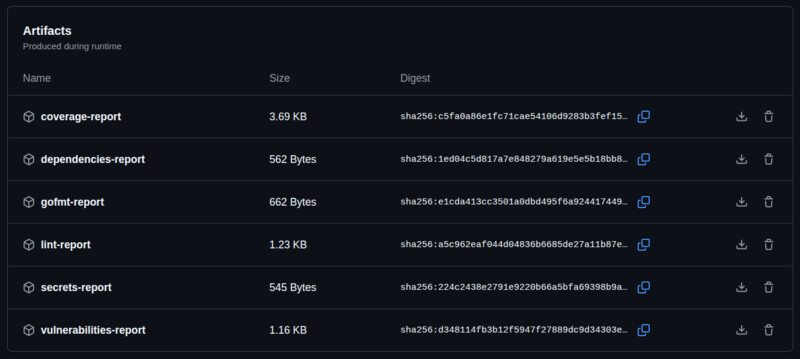
GWY CI Pipeline and its individual workflows generate a detailed summary which links each detected issue to the repo code lines where they are found so you can quickly assess the issues.
Additionally, evidence markdown artifacts will be generated with the displayed report summary seen in GitHub and each issued command output for more details so you don't need to check the debug console to debug issues.
Summary Preview:
You can check GWY CI summary and generated artifacts here.
Note: To view the full workflow report, including the Job Summary
section, please ensure you’re logged into GitHub. Anonymous users may
only see annotations and artifacts sections in report.
Artifacts Preview:
To release application versions to AWS ECR (other platforms coming soon),
you can run the GWY/Release: AWS/ECR workflow from the Actions section:
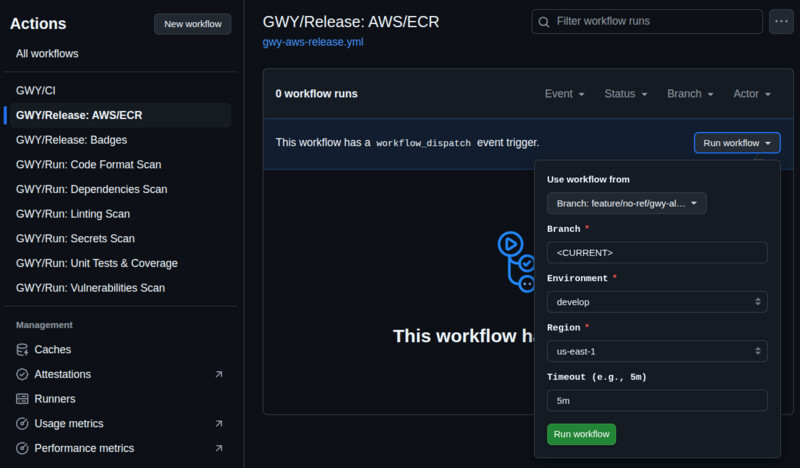
You can check a release workflow here.
You must pick the branch from which the workflow should build the application
image using its Dockerfile that expects it to be in the repo's root.
The workflow will attempt to upload the application to a repo with the same
name as your application's one according to your application module name in the
go.mod file. As version tag, it will attempt to extract it from the selected
branch, if it follows release branches convention, otherwise it will use the
entire branch name as image tag, assuming it's a feature branch version being
tested in a development environment.
If you don't follow the standard Docker repository convention using
{registry}/{app}:{version}, let's say you were pushing different
applications to the same repository and tagging them with {app}-{version},
you can edit the release workflow file .github/workflows/gwy-aws-release.yml
and locate the following config block:
     # release environment symbols configuration (token, repository, etc)
     GWY_RELEASE_TAG=""
     GWY_RELEASE_TOKEN=""
     GWY_RELEASE_REPOSITORY=""

     # Set symbols for environment: "production"
     if [ "${{ inputs.environment }}" = "production" ]; then
      GWY_RELEASE_REPOSITORY="$GWY_APP"
      GWY_RELEASE_TAG="$GWY_APP_VERSION"
      GWY_RELEASE_TOKEN="${{ secrets.GWY_TOKEN_AWS }}"

     # Set symbols for environment: "develop"
     elif [ "${{ inputs.environment }}" = "develop" ]; then
      GWY_RELEASE_REPOSITORY="$GWY_APP"
      GWY_RELEASE_TAG="$GWY_APP_VERSION"
      GWY_RELEASE_TOKEN="${{ secrets.GWY_TOKEN_AWS }}"

     # Set symbols for environment: "staging"
     elif [ "${{ inputs.environment }}" = "staging" ]; then
      GWY_RELEASE_REPOSITORY="$GWY_APP"
      GWY_RELEASE_TAG="$GWY_APP_VERSION"
      GWY_RELEASE_TOKEN="${{ secrets.GWY_TOKEN_AWS }}"
     fi
As you can see in the above code, there is a redundant conditional section for each existent environment so you can configure your different environment tokens and the release images repository and tag as you wish.
By default, GWY uses the same values for all environments as it's difficult to guess how you are handling your environment, so I'm assuming a single repository per application which each version gets tagged with a different version, either release version or branch name when testing feature branches, and you will then take care of selecting the corresponding image tag from the repository at the time of deployment to different environments.
Let's say you have different repositories for each development environment,
you can simply add an environment identifier to each repository name:
     # Set symbols for environment: "production"
     if [ "${{ inputs.environment }}" = "production" ]; then
      GWY_RELEASE_REPOSITORY="$GWY_APP-prod"
      GWY_RELEASE_TAG="$GWY_APP_VERSION"
      GWY_RELEASE_TOKEN="${{ secrets.GWY_TOKEN_AWS }}"
Let's say you want to change your target repository to a common repository among
different applications and tag images with {app}-{version}, you would then
change the corresponding deployment environments:
     # Set symbols for environment: "production"
     if [ "${{ inputs.environment }}" = "production" ]; then
      GWY_RELEASE_REPOSITORY="applications"
      GWY_RELEASE_TAG="$GWY_APP-$GWY_APP_VERSION"
      GWY_RELEASE_TOKEN="${{ secrets.GWY_TOKEN_AWS }}"
In the near future, the release workflow will include an option which will allow you to pick the naming convention to follow when pushing your releases between "single-app repo" or "multi-app repo" conventions.
Finally, let's say you have access keys per deployment environment instead of
a sole one for all environments, then you change the name of the secret per env:
     # Set symbols for environment: "production"
     if [ "${{ inputs.environment }}" = "production" ]; then
      GWY_RELEASE_REPOSITORY="$GWY_APP"
      GWY_RELEASE_TAG="$GWY_APP_VERSION"
      GWY_RELEASE_TOKEN="${{ secrets.YOUR_SECRET_FOR_PROD_ENV }}"
Don't forget, if you add a new environment, to add the option at the top of the file:
   environment:
     description: 'Environment'
     required: true
     default: 'develop'

     type: choice
     options:
       - develop
       - staging
       - production
       - { your new env here }
The release workflow also has the ability to create the repository for your applications if it's non-existent at the time of releasing. By default, GWY will attempt to create it if un-existent with mutable tags support.
You can change this default config by editing the following environment vars:
env:
  # Create application repository if un-existent?
  # Set true if you want the workflow to create
  # the ECR repository for app if un-existent.
  GWY_REPO_CREATE: true

  # Application repository creation properties:
  # If app ECR repository is un-existent and
  # GWY_REPO_CREATE was set true, do you want
  # the repository to be immutable or not?
  #
  # NOTE: Immutable repos will reject upload
  # of image with conflicting tag, otherwise,
  # it will remove the tag from the existent
  # image and tag the new image with it.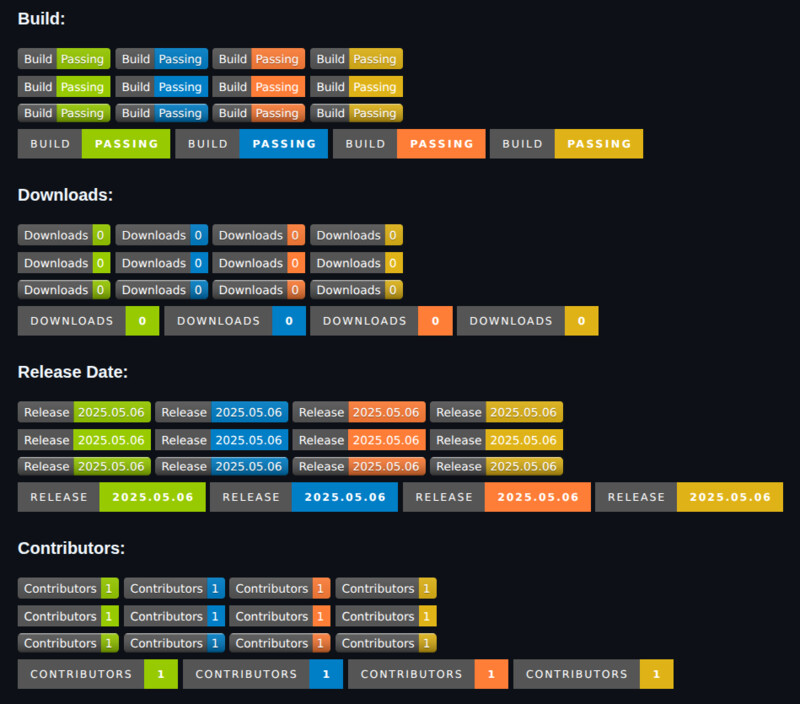
GWY_REPO_IMMUTABLE: falseGWY will trigger (after each merge to master) a workflow that will automatically generate a lot of different badges you can embed in your documentation, with different styles, sizes and colors for you to choose:
- Coverage
- License
- Downloads
- Issues
- Build
- Release Date
- Contributors
- Project Stars
- Go Version
- "Powered by GWY" :P
You can check all generated badges here.
Note: To view the full workflow report, including the Job Summary
section, please ensure you’re logged into GitHub. Anonymous users may
only see annotations and artifacts sections in report.
The workflow uses Shields.io service to generate the badges, and it can save
the generated badges in an orphan branch in your project so you can embed
them in your documentation, getting updated automatically in your next
release. You can also schedule a daily job to run the workflow, updating
automatically all your count badges like Downloads and Stars.
By default, this workflow gets triggered automatically on push events to
popular "master" branches master and main. If you happen to have a
different one, you can customize your releases master branch name by editing
the following block inside the workflow file:
on:
  push:
    branches:
      - main
      - master
Configure the badges target branch, the target directory within it and which
of the available GitHub domains you want the urls to be generated with editing
the variables at the top of the workflow .github/workflows/gwy-badges.yml,
over each variable you have comments guiding you with their options:
env:
  # commit generated badges to orphan branch?
  #
  # The badges are generated using Shields.io,
  # though you can configure the workflow to
  # commit the generated badges to an orphan
  # branch, allowing to link the documentation
  # to these badges and getting them updated
  # automatically upon each new release merge
  # to the master branch. Workflow can also be
  # run manually (or by a daily job) to update
  # the counter badges like 'Downloads' to keep
  # your client interactions up-to-date.
  #
  # Available Options:
  #  - <NONE>
  #  - <GH-PAGES>
  #  - {branch_name}
  #
  # <NONE> will not commit the generated badges,
  # <GH-PAGES> will query the GH API to get your
  # currently configured GitHub Pages branch, if
  # Pages is disabled or there is an error, it
  # will default to 'gh-pages'.
  #
  # If none of those two special names are found
  # in this option, GWY will use as target branch
  # whatever branch name was entered here.
  #
  BADGES_BRANCH: '<GH-PAGES>'

  # directory in orphan branch to commit badges?
  #
  # NOTE: if BADGES_BRANCH is set to <NONE>, this
  # configuration will be ignored all together.
  #
  # You can customize the target directory where
  # the generated badges will be commited in the
  # badges commit branch. Please note that GWY
  # will append to this directory the branch name
  # for which the badges are being generated. I
  # had seen in the past, not that often, people
  # having different badges for different branches,
  # for example coverage both in develop and master.
  # Thus, even though it might be a border case,
  # it was not that of an issue supporting the
  # ability for clients to generate badges over
  # branches, thus this dir addition was added.
  #
  BADGES_DIR: "images/gwy/badges"

  # Commited badges url type?
  #
  # NOTE: if BADGES_BRANCH is set to <NONE>, this
  # configuration will be ignored all together.
  #
  # When you request the generated badges to be
  # commited to an orphan branch, even though the
  # badges image source in the summary link to
  # Shields.io (so they can be displayed even in
  # private repos), the badges will link to the
  # corresponding badges commited files in the
  # repo so client can easily retrieve the link
  # and stick it in the documentation. GitHub
  # offers two domains to access repo files, you
  # use this option to request which domain you
  # want those URLs to be generated.
  #
  # Available Options:
  #  - github.com
  #  - githubusercontent.com
  #
  BADGES_URL: "githubusercontent.com"

  # Coverage badge color awareness customization
  #
  # Following you can customize the color of the
  # generated unit tests coverage badge based on
  # its result. The workflow will generate the
  # badge with three different colors to notice
  # "awareness" over its result based on the
  # following configuration.
  #
  # If coverage greater than BADGES_THRESHOLD_SUCCESS,
  # the badge will be generated in green. If coverage
  # is greater than BADGES_THRESHOLD_WARNING, will be
  # generated in yellow. If greater than "_BAD", will
  # be generated in orange and if lower, in red.
  #
  BADGES_THRESHOLD_SUCCESS: 90
  BADGES_THRESHOLD_WARNING: 85
  BADGES_THRESHOLD_BAD: 80
By default, the badges workflow will commit the generated badges to your
GitHub Pages configured branch (retrieved from GH API) in images/gwy/badges
directory.
The workflow adds at the end of the badges directory the name of the branch for which it generates the badges, allowing you to generate badges for different branches, for example, have badges for develop and master branches.
You can also customize which GitHub domain should be used to generate the URLs
of the commited badges, either github.com or githubusercontent.com. By
default githubusercontent.com domain is used.
You have also the ability to set the color of the coverage badge based on three different thresholds (SUCCESS, WARNING, BAD), generating the badges based on these thresholds in green, yellow, orange or red.
By default, coverage badges that are >= to 90% will be green, yellow if they are >= to 85%, orange if >= to 80% and red if lower than 80%.
GWY uses the following wonderful open-source projects and third-party services:
- hardcoded secrets scan: Gitleaks
- vulnerabilities scan: govulncheck
- linting scan: golangci-lint
- automatic generation of badges: Shields.io
I'm more than happy to receive feedback, feature recommendations, etc.
Just shoot me an email to earcamone@hotmail.com
with the word GWY in its subject or Go Workflow Yourself!, you surely
can guess which one I like more ;)