Welcome! This repository hosts code and data used during in-class demos in SI 313: Introduction to Quantitative Methods. Many of the demos are Python versions of the demos and exercises provided in the class textbook:
Chapman, C., Rodden, K. (2023). Quantitative User Experience Research : Informing Product Decisions by Understanding Users at Scale. Apress.
The original code and data that accompany the book are available at the book's website.
We will (usually) assume that you're using VS Code to run your notebooks and code.
Here's a screen recording of me setting up my VS Code environment. First, I clone the repo, then I create a virtual environment and install the modules I need to run the code.
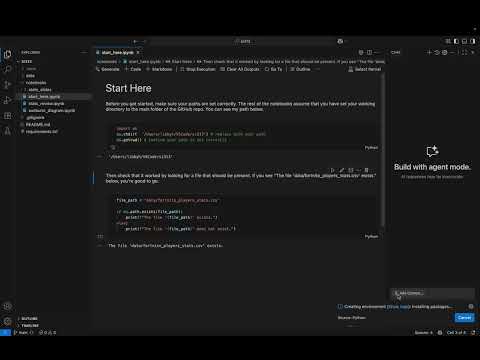
Before running any of the notebooks, you should start with notebooks/start_here.ipynb to make sure your path is setup correctly.
-
How to get Python and Jupyter extensions into VSCode
-
How to create a new Jupyter notebook file
-
How to create a virtual environment
-
How to install a Python interpreter
4a. How to specify which module versions the interpreter should include
-
How to find out what a module can do/how to do what you want to do
Step 1. Go to Extensions tab on left-side of VSCode
![]()
Step 2. Search for the Python extension from Microsoft and install

Step 3. Search for the Jupyter extension from Microsoft and install

Step 1. Select the Explorer on the left of VSCode
![]()
Step 2. Open a folder/directory if none appears in the Explorer box

Step 3. Mouse over the directories in the Explorer box
Step 4. Click the page with a plus icon to create a file and input a name ending with the Jupyter notebook file extension (ex. "filename.ipynb")

Step 0. Why to create a virtual environment
- A virtual environment helps with switching between versions of modules across projects and protecting your base interpreters from corrupted files or conflicting versions
Step 1. In a new Jupyter notebook file, click "Select Kernel" in top right of VSCode

Step 2. Select "Select Another Kernel..."
Step 3. Select the plus line that says "Create Python Environment"
Step 4. Select "Venv" to create a virtual environment
Step 5. Select desired Python interpreter (version of Python, see 4.)
Step 1. Visit Homebrew webpage and follow instructions to install
Step 2. Install a version of Python (ideally 3.12 or later) using "brew install python" in Terminal
Step 1. Visit Python webpage
Step 2. Download appropriate .exe file, then run once downloaded
Step 3. Note filepath where Python is installed to
- When creating the virtual environment, after selecting the desired Python interpreter, select a textfile with module versions specified
- For this class, we'll use the versions in requirements.txt